Managing Tickets
Tickets are the core of NextGen. Whether it is a customer support request, an internal issue, or a bug report — everything flows through the ticketing system. This guide shows you how to create, manage, and resolve tickets.
Viewing Tickets
Go to Tickets Manager in the Super Dashboard sidebar. You will see all tickets in a list view.
Tickets Manager
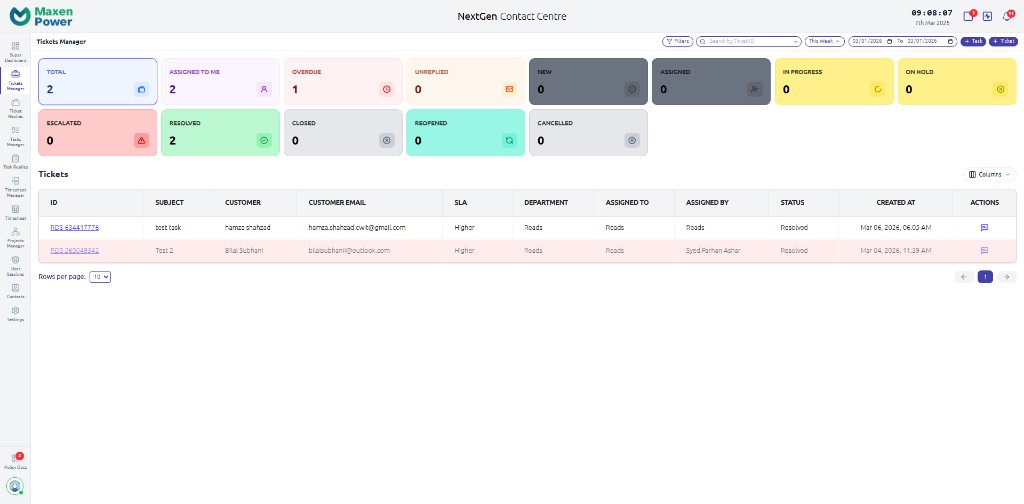
Table View
The default view shows tickets in a table with columns:
- ID — Unique ticket number
- Subject — Brief description of the issue
- Status — Current state (Open, In Progress, Resolved, etc.)
- Priority — Urgency level (Low, Medium, High, Critical)
- Assigned to — Person responsible for the ticket
- Created at — When the ticket was submitted
- SLA — Service level agreement status
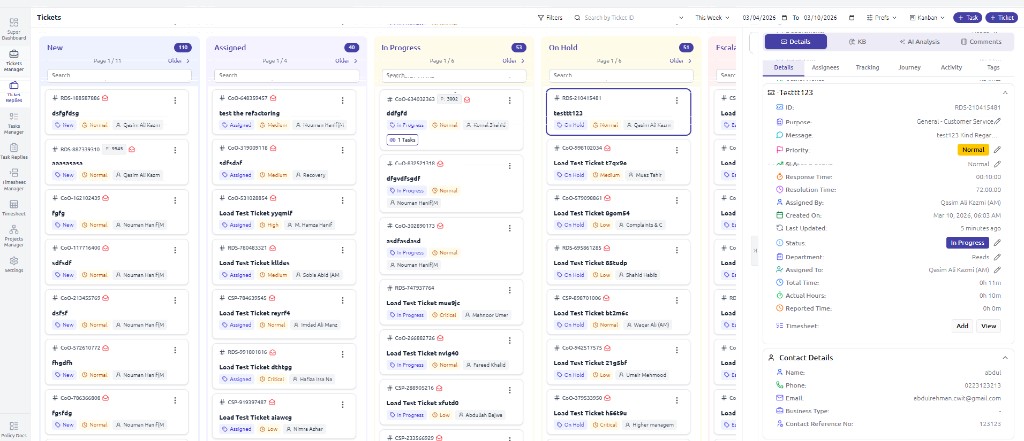
Kanban View
Switch to the Kanban view to see tickets organized by status in columns. You can drag and drop tickets between columns to change their status. Each column shows tickets in that stage (New, Assigned, In Progress, On Hold, Escalated, etc.). Click a ticket to open the detail panel on the right with tabs for Details, Assignees, Tracking, Journey, Activity, and Tags.
Filtering & Searching
Use the filter bar at the top to narrow down tickets:
| Filter | Description |
|---|---|
| Status | Show only open — Filter to display tickets that are open (not yet resolved or closed) |
| Priority | Filter by Low, Medium, High, Critical |
| Assigned to | Show tickets assigned to a specific person |
| Department | Filter by team or department |
| Date Range | Show tickets created within a date range |
| Type | Filter by ticket category |
Creating a New Ticket
Click the Create button
Fill in the details
- Subject — A short, clear title for the issue
- Description — Detailed explanation (supports rich text formatting)
- Priority — How urgent is this?
- Assigned to — Who should handle it?
- Type — What category does it fall under?
- Attachments — Upload any relevant files (up to 25MB each)
Submit the ticket
Working on a Ticket
Click any ticket to open its detail view with conversation, details, and contact info:
Ticket Detail View
Update Status
Change the ticket status (e.g., from Open to In Progress) using the status dropdown.
Add Replies & Comments
Write replies to communicate with the customer or add internal comments visible only to your team. Use the rich text editor for formatting, links, and images.
Attach Files
Drag and drop files or click the attachment button to upload documents, screenshots, or other files. Supported formats include PDF, images, Word, Excel, and more.
Assign or Reassign
Change the assignee if someone else should handle the ticket. You can assign multiple people as collaborators.
View Activity Log
The activity log shows every change made to the ticket — who changed what, when, and what the previous value was. This is useful for tracking progress and accountability.
SLA Tracking
Tickets may have SLA (Service Level Agreement) targets for response time and resolution time. You will see SLA indicators on the ticket:
- Green — On track, within SLA
- Yellow — At risk, approaching deadline
- Red — Breached, past the SLA deadline
Linking Tickets
You can link related tickets together. This is useful when multiple customers report the same issue or when a ticket depends on another being resolved first.
Bulk Actions
Select multiple tickets using the checkboxes and apply bulk actions:
- Change status for multiple tickets at once
- Reassign tickets in bulk
- Update priority levels